


Substackers want to ditch Stripe. Switching to crypto for supporters and writers: a quick set-up guide (with pictures)
Start accepting crypto donations, or send cryptocurrency to your favorite writers, in just minutes.

If you like this guide, please don’t hesitate to click like♡ and restack⟳ ! It’s a quick way to make sure more people will get to enjoy it too.
And don’t hesitate to subscribe to my newsletter for free to receive my new articles right in your inbox!
Stripe came under fire a few days ago when its CEO, Patrick Collison, posted a picture of him having a nice jog in occupied Palestine while not 50 miles away, children in Gaza are running for their lives on the daily.
→ Jump to setting up crypto as a writer
→ Jump to sending crypto as a subscriber
This absolutely tone-deaf and disgusting move from him (an Irish national who even went to speak to Palestinians in the West Bank 10 years before) prompted a large discussion on Substack, and the consensus emerged that both writers and subscribers wanted to move away from Stripe and set up other means of financial support.
How is Stripe relevant to Substack? Well, when you pay a subscription to your favorite writer(s) through Substack, your payment gets processed by Stripe.
We don’t get a choice in this. Substack only partners with Stripe to process payments, and so do other platforms like Patreon, buymeacoffee, etc. Stripe has become ubiquitous, and we want to boycott so as to send a message: Substack, allow us to use processors other than Stripe! If it’s our newsletters, then it should be our choice of payments as well.
In any case, I wrote this short guide on using crypto as a writer or subscriber in order to help people move away from Stripe. My own paid subscribers have told me that this is what they wanted, and I think many writers will agree that it’s a good idea to diversify your sources anyway — Stripe has been known to close down accounts for various reasons, and that’s reason enough.
If you’ve never deal with crypto before, don’t worry! You’ll find that this guide is pretty easy to follow for what we need it to do.
Setting up crypto as a writer
(If you’re a subscriber who wants to support writers with crypto donations you don’t need to look at any of this, please directly go to sending crypto as a subscriber.)
What we’ll be doing here
In this part, we will be setting up a wallet and an account on an exchange so that you can start receiving cryptocurrency from your subscribers.
You will be using the wallet address to receive subscriptions and hold the crypto, then transfer that to the exchange where you can sell it for real money (or invest it).
Both the wallet and exchange give you addresses which are unique and which are used to send and receive crypto.
Opening a wallet
I recommend the Exodus app on your phone. Check their website here: www.exodus.com and download the app from the App Store or Google Play.
What Exodus does is set up a wallet on your phone. When you first open the app, you’ll be greeted by a welcome screen:
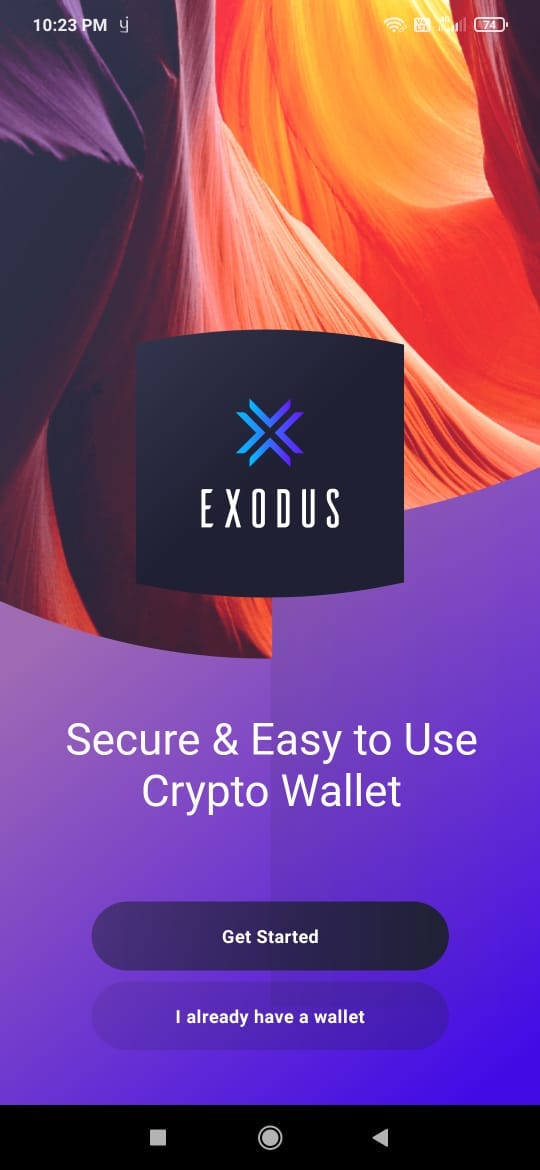
This screen is probably from an older version, but what you’ll want to do is tap “Get started”. This will immediately take you to the main app, and specifically on the wallet screen (note that these screenshots were taken on an Android phone, the iOS version might look different):
Immediately, we want to tap on the More tab at the bottom of the screen (circled in red)
Then, on that new screen, tap on the Security button
I can’t share screenshots for this next part, but once you open the Security view, tap on “Backup” to generate your 12 word pass phrase. The app will put a warning screen and ask you to confirm that you understand what the pass phrase is. Then, you’ll be able to tap “View secret phrase”. Do so and a list of 12 common words will be revealed, but you can only see them
Write down these words somewhere secure. Do not ever share them with anyone else. Ideally, keep it safe in various places: write it on paper and place it with your important files, put it in an encrypted password manager, etc.
You need this pass phrase if you ever lose access to your wallet, for example if you reset your phone or buy a new one. Then, you’ll be able to reinstall the Exodus app at any time and in the welcome screen, select ‘I already have a wallet’, where you’ll be prompted to enter your 12-word pass phrase to recover access to your wallet.
You can’t recover access whatsoever without this pass phrase, so never lose it, and never give it to anyone else.
You also can’t move away from Exodus with just the passphrase however, but you can reinstall your Exodus wallet anywhere at any time with just the pass phrase. If you want to take your wallet to something other than Exodus, you’ll need the private key, but we won’t cover that in this guide.
Once you’ve written the pass phrase down somewhere, tap “Done” and the app will ask you for the Xth word in the sequence to make sure you did actually save a copy of this phrase.
→ What we’ve done so far is set up a wallet on your phone to hold crypto and made sure that you can never lose access to it.
There are still a few steps, but it’s nothing complicated.
Go back to the main wallet view, and swipe right on the Bitcoin line, which should be at the very top of the list:
A “receive” button will appear. Simply tap on it, and a screen with an address and QR code will pop up:

This is the address your subscribers must send crypto to. With bitcoin, it starts with bc1. The address in the screenshot above is actually not yours but mine, so copy the one from the app and not from this guide! But, since there’s lots of crypto scams going around, this screenshot also shows that you can (and should) indeed send this address out to people; it won’t compromise your wallet or anything and it’s how you receive bitcoin.
You can also give out the QR code for easier input, since these wallet addresses are pretty unintelligible.
Note that it says “receive BTC on the bitcoin network only” at the bottom. We won’t get into networks but there’s a few different ones. Every (reputable) coin generally has their own network anyway, and it’s good enough for what we need it to do.
You need to repeat the steps to get the ‘receive’ address with every coin you want to accept. I recommend Bitcoin (BTC), Ethereum (ETH) and Litecoin (LTC). Bitcoin and Ethereum are the two major coins. Litecoin is not super famous or valuable, but the exchange fees are much lower than the other coins so it’s a good option to offer too. Ethereum has the highest exchange fees out there.
Don’t add addresses for every single coin. There’s lots of “shitcoins” in crypto since anyone can make their coin. These can be highly volatile, going from over 1$ per coin to 0.10 literally overnight. There’s also lots of scam coins. I don’t know what the likelihood of of getting scammed with these coins is, but since the purpose of this guide is to give you the confidence to accept crypto donations, just stick to the big ones.
Copy all the addresses somewhere with their associated coins, e.g. Bitcoin (BTC SegWit network) - bc1whatever. Subscribers will need to know the address, network and the coin to send crypto your way. Then just paste that list in your support me pages or wherever else.
→ At this point, we’ve set up a wallet and copied the addresses. You are now ready to start receiving crypto! However, just having crypto doesn’t do much: you’ll probably eventually want to turn it into real cash money to use it.
Sending crypto to the exchange
The second step of setting up your crypto is to get an account on an exchange. You can do this part later though, once you start receiving crypto on Exodus.
Crypto is super volatile (except for the USDT which is always equal to 1 USD), so I don’t necessarily recommend keeping crypto on your Exodus wallet. Sure, bitcoin is currently surging at almost 100,000$ per BTC. But one month ago it was worth 67,000$ per BTC. And it’s gonna go down again eventually.
Due to this volatility, it’s possible that when someone sends you 5$ worth of bitcoin, they rapidly turn into 10$ or more. But they can also turn to 1$ overnight. It’s a personal question as to whether you want to cash out your crypto as soon as you receive it, or hold onto it to sell at a higher price later. I can’t answer that question for you, but I still recommend you transfer your Exodus donations to the exchange wallet as soon as you receive it or periodically, because it’s more flexible over there.
→ A crypto exchange is a place where you exchange one crypto for another. You can also cash it out for USD. It’s like the stock market; you buy and sell crypto to other people who are putting in buy and sell orders.
You might have noticed that Exodus has a place to trade and swap crypto (trading meaning that you buy or sell with real money, swap meaning you exchange one crypto for another). They also work as an exchange, but I don’t recommend it because the fees are usually much higher and the functionalities much more limited.
We’ll be setting up an account on Binance as the exchange. Look, there’s tons of exchange and some of them, like FTX that’s been in the news, can be untrustworthy. I’ve been using Binance for several years, even before I started writing, and I’ve never had any problems with them.
Binance is available mostly worldwide, and you can use it to easily trade (transfer from and to real money) and swap (transfer from one coin to another). It does require you to confirm your identity with legal documents in some cases (it depends on the country and in the situation), but you should be able to get started quite easily.
Unfortunately since I’ve had an account for so long, I don’t entirely remember how to register and I can’t send screenshots of the registration screen. Instead, please consult their own help files.
Regardless, once you have an account on Binance and it’s been verified and ready to go (I highly recommend waiting for your verification to happen before you do anything on the Binance app), you’ll see this:

This is Binance’s “lite” view, which makes it easier for newcomers and is sufficient for the purposes of this guide. Down the line you might want to switch to the
→ Okay, important disclaimer at this point though. Binance is a trading platform, much like the stock market. It has tons of options and tons of ways of going into debt or losing all your savings. In this guide we are only cashing out crypto; this is safe if you follow the steps. Just do your own research before going into futures or margins, and if you don’t understand something, don’t touch it.
You’ll want to tap on the arrows icon highlighted in the screenshot above, and then pick “Deposit” in the menu that pops up. Then, you’ll be asked to choose the crypto you want to deposit on Binance. Let’s assume you received some BTC earlier and want to deposit those on Binance: tap on Bitcoin.
You’ll then be asked to select the Network. Double check the network you need to pick: they need to match between Exodus and Binance. Exodus transfers Bitcoin on the new and improved SegWit network (addresses start with bc1), so select that one.

Once you’ve selected your network, one last screen pops up. It contains a QR code and a deposit address too, much like the one on Exodus. Copy the “Deposit address” they give you. You can tap the copy icon which looks like two gray squares overlapping each other to instantly copy the address to your clipboard.
→ You could technically use this Binance address to receive subscribers donations. However, for various reasons, it’s better to transit through Exodus. One reason is that while Binance also provides a wallet, it’s registered to them: if they delete your account, for example, it will also delete your Binance wallet.
Now, leave Binance the Binance App and open up Exodus again.
On Exodus, from the wallet view, tap on the associated crypto (in this case BTC) and you’ll be taken to the trading view.

Tap on the outgoing arrow in the top left corner, which is the Send function. Then, in that screen:

Simply paste the address Binance gave you earlier (tap on the field and it will paste your clipboard automatically) and tap Continue.
Because I don’t have my own screenshots for what happens after this, we’ll be continuing with the official Exodus documentation files.
The first time you send a payment out with Exodus, you’ll see a warning screen telling you that transactions are permanent. Once crypto is sent out, you can’t cancel it.
Tap “Ok” and you will see this screen:
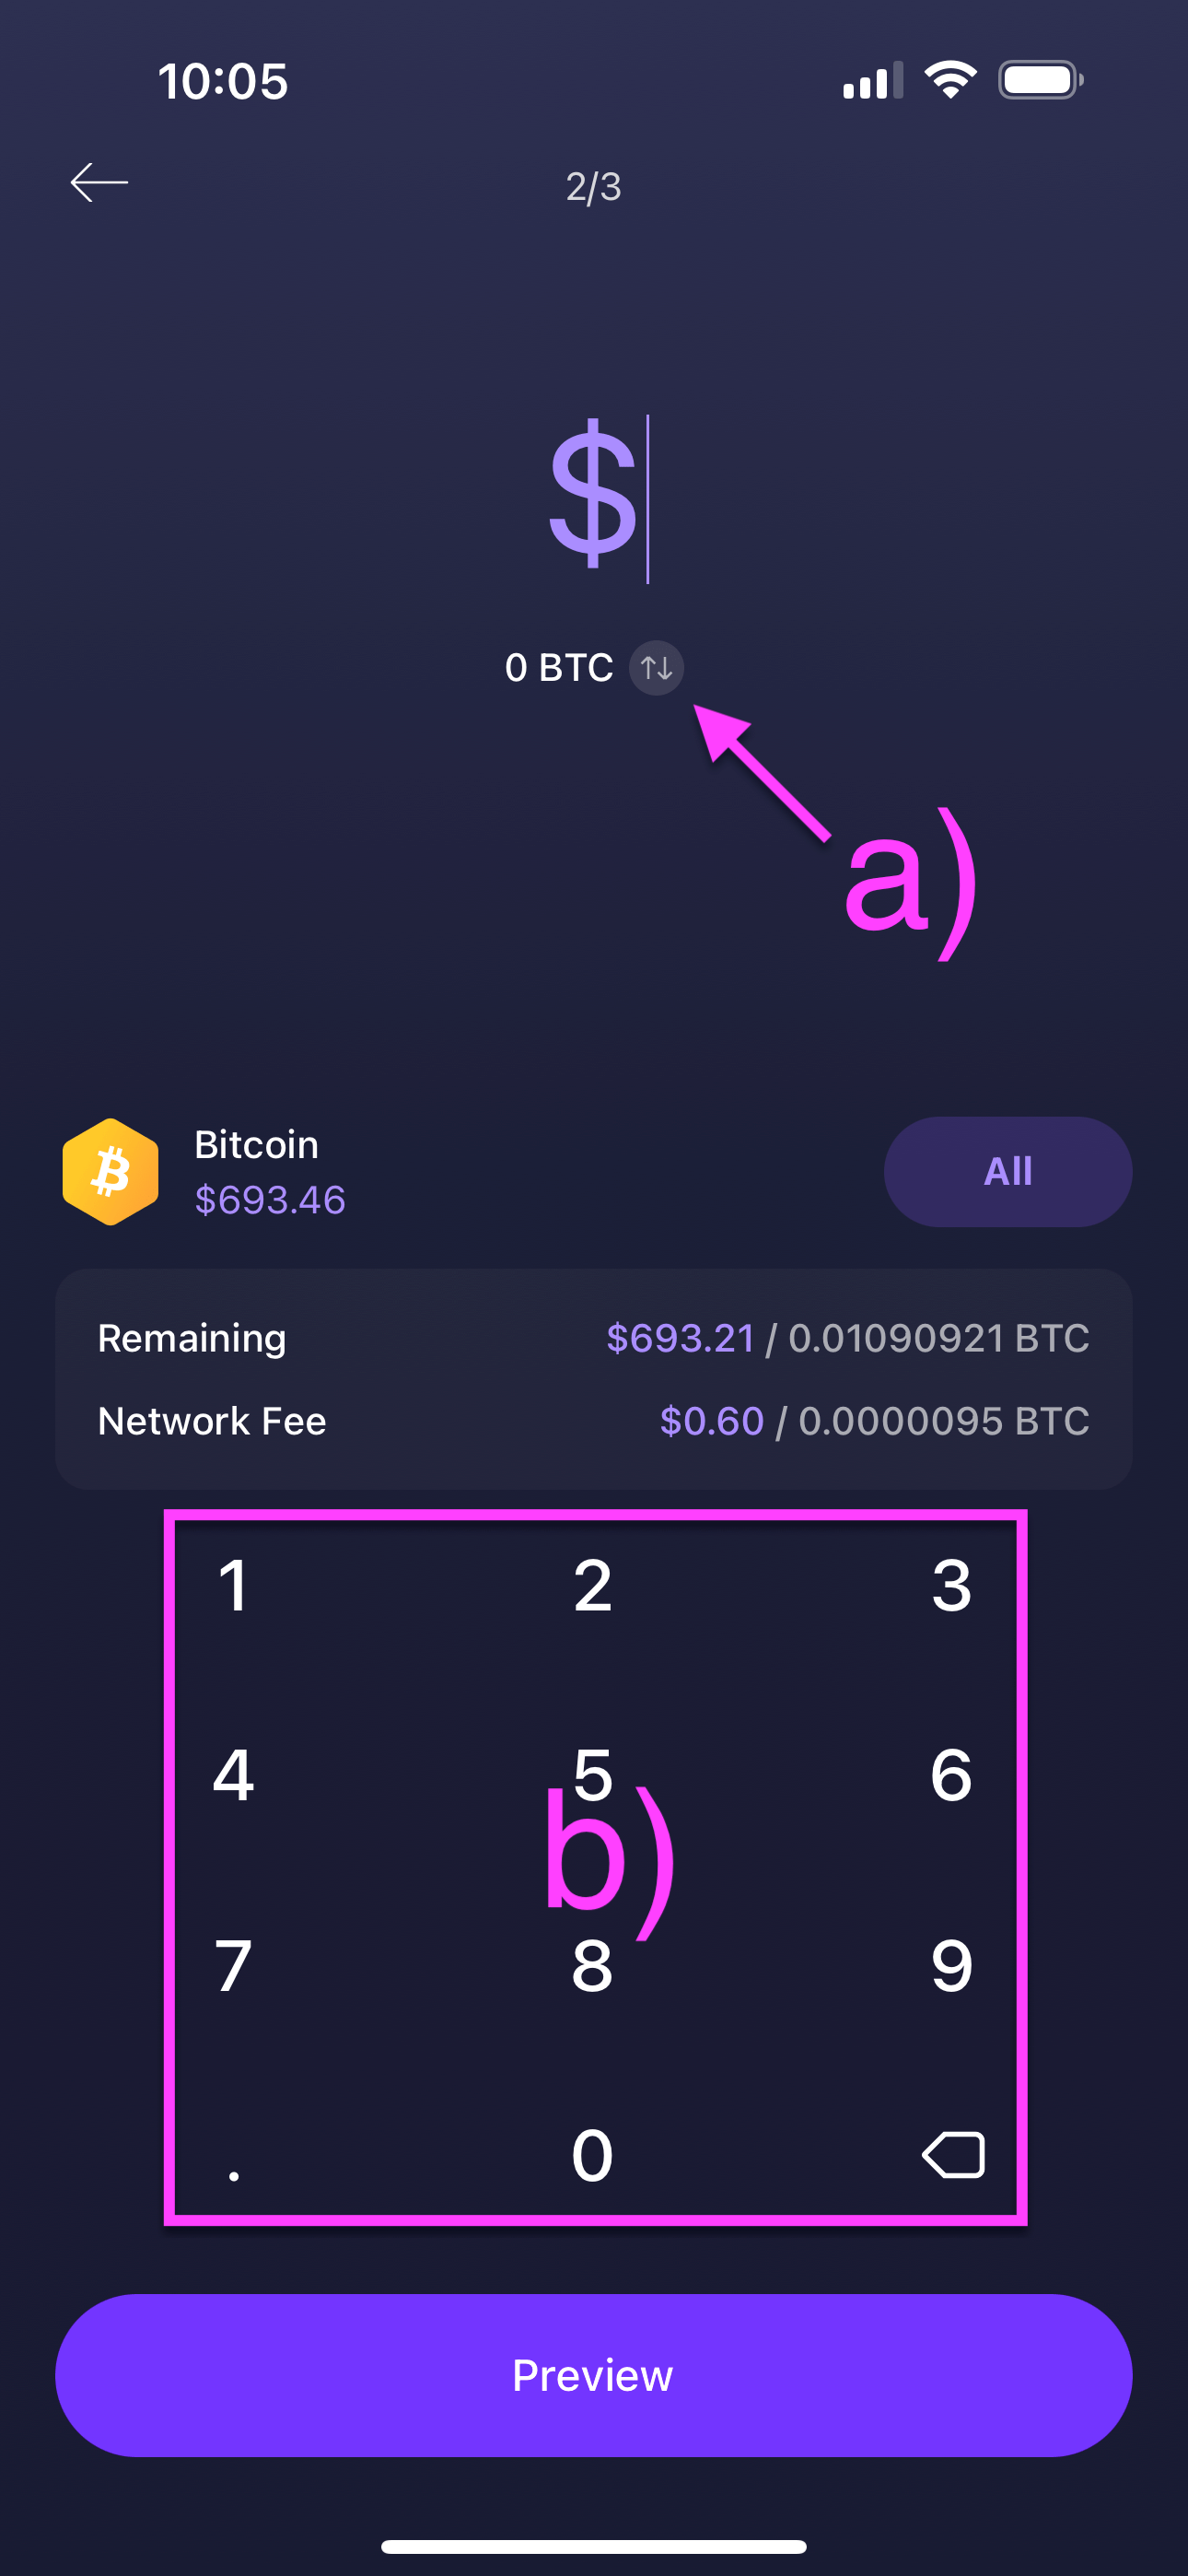
You can enter the amount either in fiat (USD) or crypto. Since in this guide we want to immediately cash out all crypto from Exodus and into Binance, just tap “all” next to the BTC amount to move it all at once. Exodus conveniently shows you how much that BTC is worth in $ and how much the transfer fees will be (which as you can see in this example, is almost nothing).
Exodus also points out that you can tap the “advanced” menu icon:

From which you’ll be able to select the fees (lower fees means higher processing time to transfer your crypto). Low fees are great, but also means your bitcoin might get “stuck” in transit for some days. It’s up to you to decide what’s a good amount here.
In any case, tap “Preview” when you’re ready to cash your crypto out on Binance,
and you will then be prompted to review the payment and then slide a confirmation bar to finally send the payment out.
If you did everything correctly, you should soon have these coins available in your Binance wallet! We’re almost done!
Turn that crypto into real money
Once your crypto is on your Binance wallet, you might ask yourself… what do I do now?
There’s various options.
You can put a sell order on Binance, selling it for a possible profit.
You can cash it out as real life $$$
Or, you can also put that crypto into the ‘Earn’ feature, which are automated loans that give you some pretty good annualized interest (something like 5-10% for USDT). If you have USDT in your Binance wallet, it gets automatically invested in the Earn future with daily earnings.
It’s completely up to you to do what you’re comfortable with but for this guide, we’ll be looking at how to cash this crypto out at the current price and turn it into USD in your bank account (note that I say USD, but Binance supports a lot of different currencies).
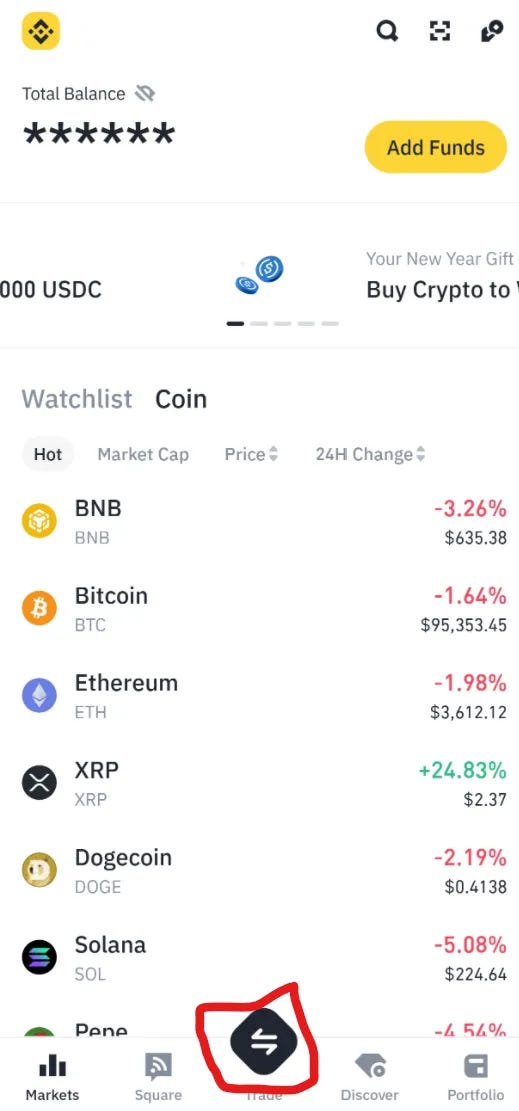
Open the binance app and press the double arrows again.
Then, select “Sell crypto to USD” in the pop-up menu. you will be taken to a screen where you can select the crypto you want to sell from the ones that are in your Binance wallet. Tap on the crypto you want to cash out, and you’ll be taken to the Sell screen:

The Lite version of the app conveniently spells it out. In this case, it specifies “I want to sell X BNB” (BNB is Binance’s own coin).
You can tap the 100% button to sell all of your crypto at once, and then click on ‘Sell’ or ‘Select receive method’ at the bottom (I think the screenshot above is a bit outdated and the wording changed).
Binance will then ask you where you want to receive that money. In this case, since there is a credit card associated with this dummy account, it’s an option that the user can pick:
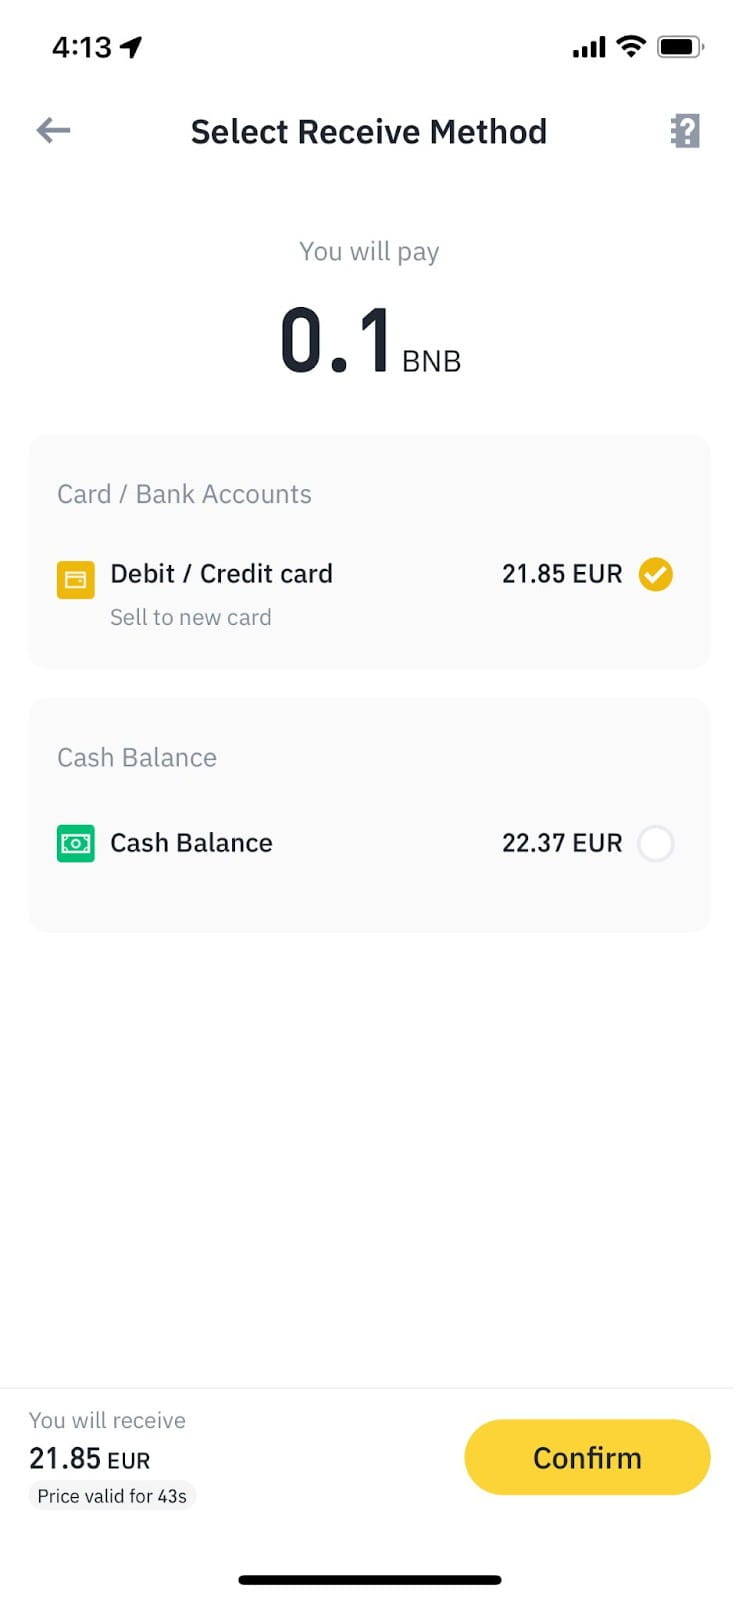
Different withdrawal methods will be available to you depending on which currency you selected, with the most common one being credit card withdrawal. If you haven’t added a payment method to your Binance account yet, you will be prompted to add one during this step. Do that and confirm everything that needs to be confirmed.
And that’s it, congratulations! In a day’s time at most, you will receive the fiat money on your bank account.
Every time you want to cash your crypto donations out, simply repeat the process of sending the coins from Exodus → Binance → Cashing out.
You are now finished with this guide, but I recommend reading the last section, Please be aware of this when trading with crypto, for important tips.
Sending crypto as a subscriber
It’s possible that you are already trading crypto on the regular, or perhaps you’re just getting into it. For the purposes of this guide, and because this was requested by my own subscribers, we’ll only be looking at how you can send crypto to writers or other creators that you want to support.
What you’ll need
First, you’ll need the address you want to send crypto to. You’ll also need to know the network you need to use.
Then, you’ll need to go through an exchange. The exchange is a stock market for cryptocurrencies where you buy them with real money (and trade crypto too, but we won’t get into that for this guide).
You don’t need anything else, except probably a means of buying crypto such as a credit card or bank account.
Finding the wallet address
The first thing we’ll need to do before even thinking about buying crypto is get an address to send it to. The writer you’d like to support should already have one published somewhere. If they don’t, ask them if they support crypto (and if they don’t have a crypto donation link, explain the problem with Stripe and link them this guide!)
→ A crypto address should look something like this: Bitcoin (BTC SegWit network) - bc1qcdla40c3ptyrejvx0lvrenszy3kqsvq9e2yryh. This is my own Bitcoin wallet address. It specifies the cryptocurrency (Bitcoin), the network (SegWit), and the address itself (bc1 followed by a bunch of characters).
To successfully send crypto to someone, you need to know all three components, otherwise your transfer might get lost or not even get sent. Just keep that information somewhere near for now, we’ll get back to it soon - but first, we need to buy crypto somewhere.
Getting a Binance account
Binance is a crypto exchange. There are many, and you’ve probably heard about FTX that was forcibly closed down for being a scam. I’ve been using Binance for years now, even before I started writing, and I’ve never had any issues with them so that’s why I recommend them.
You’ll need to download the Binance app and follow the steps to create an account. Please note that they require identity verification before you’re able to buy crypto with a credit card.
I recommend not using the app at all until your account is confirmed and verified. Once that’s done, you’ll have access to your Binance wallet which looks like this:
This is the Lite view, and if you get into crypto you’ll want to switch to the Pro view pretty soon, but it’s sufficient for what we want to do here.
Tap the big Trade icon at the bottom of the screen - a menu will pop up with various options. Pick the first one, “Buy crypto with USD” (other currencies are also available). You will then be taken to a screen where you can select which crypto you would like to purchase:
In this case, let’s assume the creator only accepts Bitcoin. You will thus need to purchase Bitcoin; you can’t send ETH, BNB or whatever other coin you see up there to an address that is only for Bitcoin.
You will then be taken to a screen that lets you select the amount you want to purchase:

The language is thankfully pretty clear and should prevent errors. In the screenshot above, the text reads: “I want to pay X euros”. If you want to make a 5$ donation to a writer of your choice, then input 5 in that field — you can change the currency by tapping its three-letter code. You can also buy X amount of crypto by tapping “by crypto” above the currency picker, and that’s why you have to be careful of what you’re paying. 1 bitcoin is currently worth 96,000$, so that would be a lot of money spent. Of course, most cards will stop you from making such a huge purchase, but coins like Litecoin are worth ~100 USD per 1, so this could be an easy mistake to make (purchasing 5 LTC for 500$ instead of 0.05 LTC for 5$).
Then, simply click the buy button after double-checking your inputs. You will be asked to select a payment method, and if there’s no method registered on your Binance account, you will be prompted to add one.
If you are successfully able to add your payment method, you will then be asked to confirm the order:
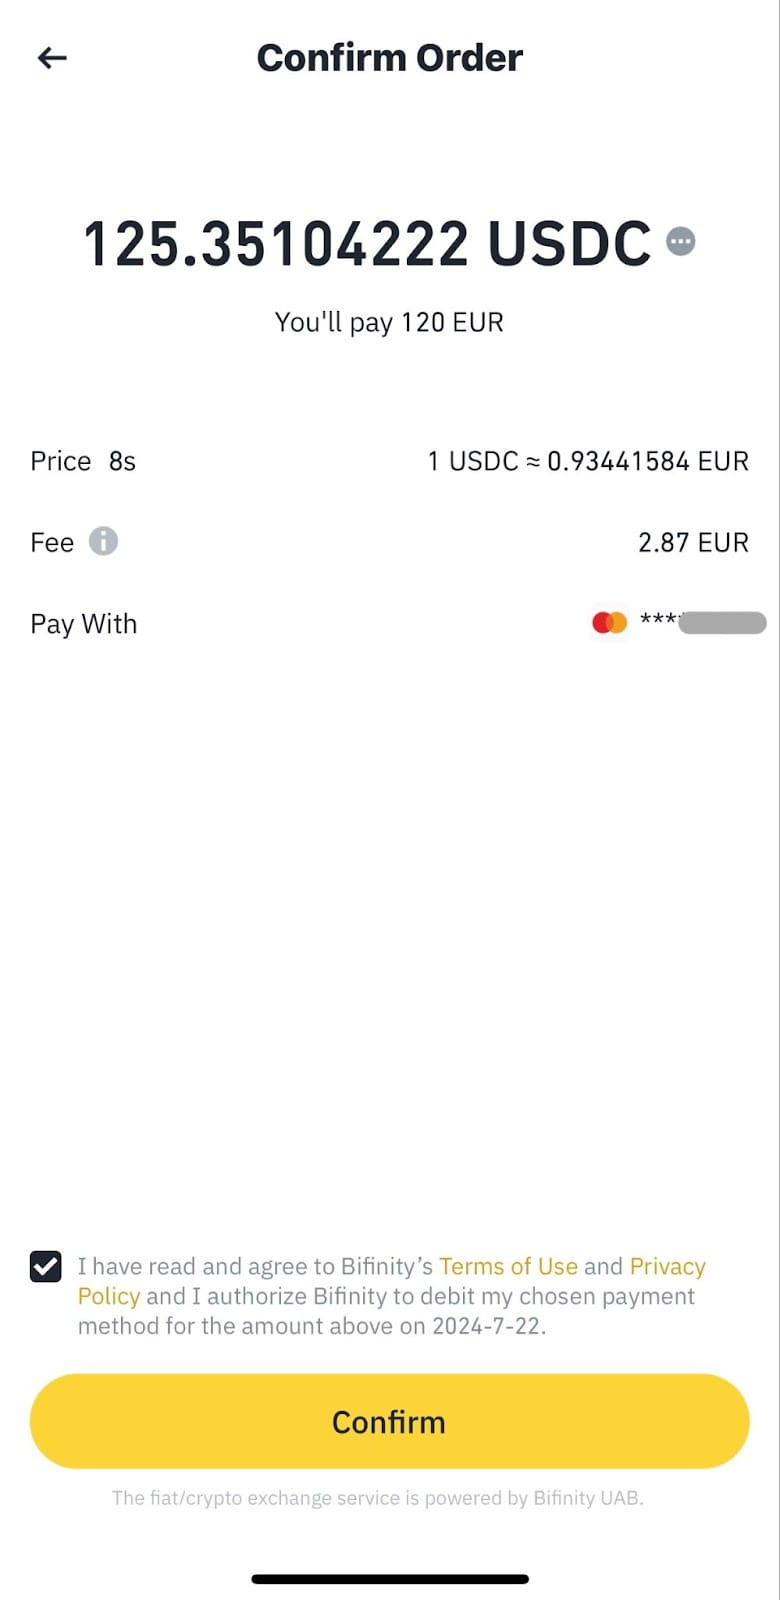
Make sure that you’re paying the dollar amount you actually intend to pay. If you mistakenly buy too much crypto, you can still sell it back right away, but you will have to pay fees and lose some money, so let’s avoid that. as much as possible.
P2P trading and credit card purchase
Binance allows you to purchase crypto with what they call the P2P — peer-to-peer — method. When selecting P2P funds, you are able to purchase crypto at better rates than when buying directly from Binance. However, the methods to authenticate that purchase depend on the seller and take more or less longer to get into your Binance account. Sellers are not entirely verified either, so it’s kind of at your own risk.
Personally, I’ve only ever bought crypto directly from Binance with the method above and never touched the P2P feature.
Sending that money to a content creator
Next, to send that money to a content creator (or any other wallet address really), you’ll need to tap the “Portfolio” button, which lists all your crypto assets on Binance, and then tap the big gray “Take out” button.

A menu will pop up. Choose Withdraw [send to a known crypto address via crypto network]. You will then see a list of the coins you have available, where you should see the BTC or other coin you bought in the last subsection.
Select the crypto you want to send out, making sure once again that the crypto you are sending to someone else’s wallet matches the type of wallet. That is, you can only send Bitcoin to a Bitcoin address - you won’t be able to send it to an Ethereum address.

In the next step (see above), you will be asked to provide three things:
The wallet address you want to “withdraw” (send) the crypto to. This is the second of our three components from earlier. Paste the address that the writer provides.
You will also need to select the network. This is the third and final component we need. Again, if the author doesn’t provide the network, ask them for it - don’t guess, because your crypto will get lost in transit. Binance says it can auto match networks but I’m not entirely sure it’s completely failsafe, so just ask the author for their network and double check that you select the right one. If their network isn’t available on Binance ask if they can provide another network’s address for you.
finally, you need to add the withdrawal amount, i.e. how much of that cryptocurrency you will be sending over. Once you input a number, Binance tells you approximately how much that is worth in your currency, so you can make sure that you’re not overspending.
Double-check everything and if everything looks good, just tap “Withdraw” in the bottom left. You’ll be prompted to confirm the transaction and tap “Confirm”.
And that’s it! You’ve successfully bought and sent crypto to an address! All writers and other content creators thank you very much for your support 🫡
Of course, this guide is primarily aimed towards subscribing to content creators that accept crypto. But once you have money on Binance, you can send it to any other crypto wallet, including your own. Some stores even accept crypto — but you can’t purchase things directly online with Binance, you’ll need to withdraw that crypto into another wallet (see the setting up crypto as a writer section of this guide to set up your own wallet).
This portion of the guide is now over, but I urge you to read this final section below to avoid very costly errors:
Please be aware of this when trading with crypto
Cryptocurrency is not anonymous. Many exchanges such as Binance require you to provide legal identification. On top of this, bitcoin transfers can be looked at by anyone in a public ledger (here’s one website). They will only see the receiving and the sending addresses as well as the amount traded, but it’s otherwise publicly accessible information.
There are lots of scams. If you only use crypto for the purposes outlined in this guide, you’ll be fine.
There are fees associated with crypto. It’s difficult to say how much exactly as it depends on so many different things due to crypto’s decentralized nature, but you will be paying fees on those donations.
There are also lots of stuff you can do with crypto. So be careful. To give just one example, Binance allows you to trade futures and on margin, which are essentially a debt you owe to Binance.
Thank you for reading this guide. I hope you found it useful. I have my own crypto addresses if you’d like to support me in this effort. All of my writing is freely available and will continue to be regardless.
Bitcoin (BTC SegWit network) - bc1qcdla40c3ptyrejvx0lvrenszy3kqsvq9e2yryh
Ethereum (Ethereum network) - 0xd982B96B4Ff31917d72E399460904e6F8a42f812
Litecoin (Litecoin network) - LPvx9z9JEcDvu5XLHnWreYp1En6ueuWxca
Folks can of course do what they want, but:
1. I would only use crypto if I couldn’t do without and had no other payment options, but such a thing has not yet come to pass.
2. I put very little stock in the politics of consumerism, in voting with one’s wallet; so I can’t be bothered to boycott Stripe.
Crypto is for criminals.